Getting Started with the Morehouse Supercomputing Facility (MSCF)
Welcome to MSCF! While we build out our own supercomputing infrastructure, we are using resources at the Texas Advanced Computing Center (TACC) to provide HPC access to our researchers. MSCF is not hosted at TACC — TACC is a partner providing compute time while our facility is under development.
This guide walks you through everything you need to get set up on TACC and run your first job.
Step 1: Create Your TACC Account
After you submit the access request form, the allocation manager will add you to the project. You’ll receive an email from TACC with the subject line:
“TACC Project Invitation Action Required: Account Request”
Here’s what to do:
- Open the invitation email and click the link to create your account
- Fill out the registration form:
- Use your institutional email (e.g., @morehouse.edu)
- Choose a username you’ll remember — this is what you’ll use to log in
- Set a strong password
- Complete the account verification if prompted
Important: You must use the link in the invitation email — do not go to the TACC portal separately. The invitation link connects your new account to the project allocation automatically.
Step 2: Set Up Multi-Factor Authentication (MFA)
TACC requires MFA for all logins. Set this up before trying to SSH in.
Do NOT use SMS/text messages for MFA. Use an authenticator app instead.
There are two ways to get to the MFA setup page:
Option A: Go directly to TACC Accounts at accounts.tacc.utexas.edu and click Multi-factor Auth in the sidebar.
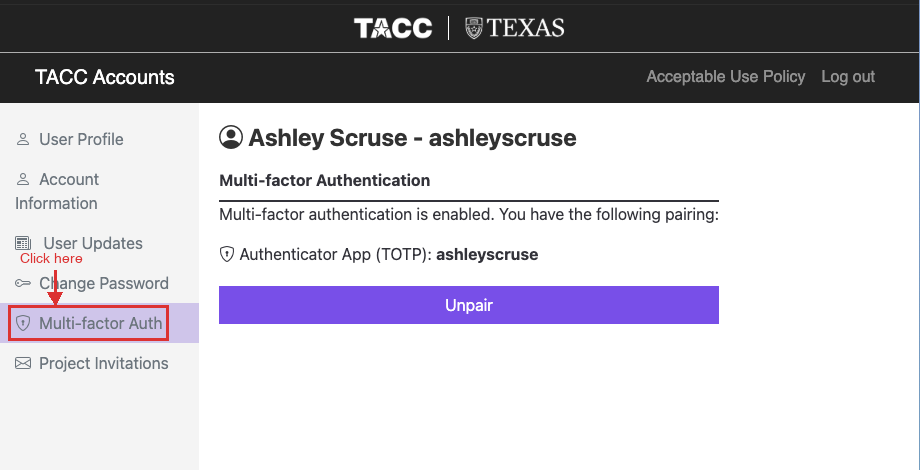
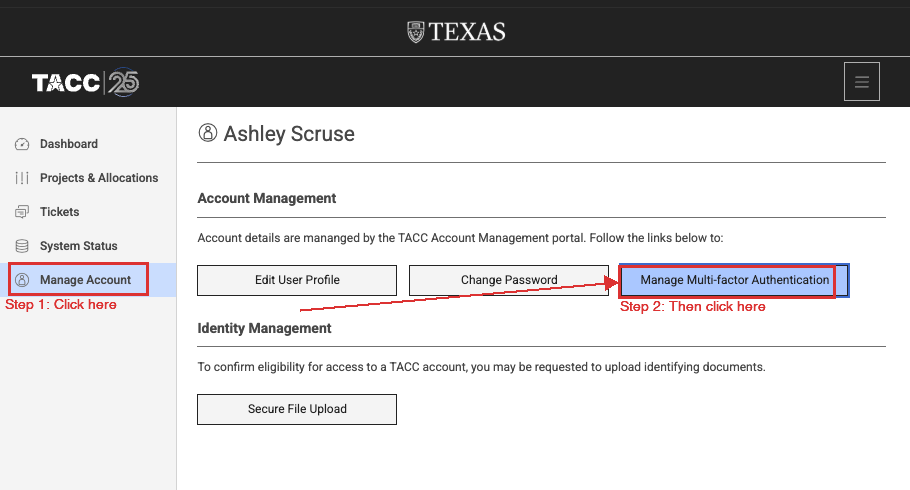
Option B: Log in to the TACC User Portal at portal.tacc.utexas.edu, click Manage Account in the sidebar, then click Manage Multi-factor Authentication.
Once you’re on the MFA page, set up an authenticator app — here are our recommended options:
- Follow the on-screen instructions to pair your device
- Test it by logging out and back in to the portal
Step 3: Log In via SSH
Once your account is active and MFA is set up, connect to the system.
On Mac or Linux (Terminal)
Open your terminal and run:
ssh your_username@system_hostname.tacc.utexas.edu
The part after @ is the hostname of the system you want to access, followed by .tacc.utexas.edu. Replace it with the correct one from the table below. For example, to connect to Lonestar6:
ssh your_username@ls6.tacc.utexas.edu
When prompted:
- Enter your TACC password
- Enter your MFA token (from your authenticator app)
Note: When you type your password and MFA token, nothing will appear on the screen — no characters, no asterisks, no dots. This is normal. The terminal is still receiving your input. Just type carefully and press Enter.
On Windows
Use one of these SSH clients:
- Windows Terminal / PowerShell (Windows 10+): Same
sshcommand as above - PuTTY: Download from https://www.putty.org/, enter the hostname, and connect
- MobaXterm: Download from https://mobaxterm.mobatek.net/ (recommended for beginners — includes a file browser)
System Hostnames
| System | Hostname | Details |
|---|---|---|
| Lonestar6 | ls6 |
System specs |
| Frontera | frontera |
System specs |
| Stampede3 | stampede3 |
System specs |
| Vista | vista |
System specs |
Not sure which system to use? Check the system specs linked above to see which one fits your workload.
Step 4: Understand the File System
TACC systems have three main storage areas. Know which to use:
| Location | Path | Purpose | Quota | Backed Up? | Purged? |
|---|---|---|---|---|---|
| $HOME | /home1/0xxxx/username |
Config files, scripts | ~10 GB | Yes — backed up regularly | No |
| $WORK | /work2/0xxxx/username |
Code, libraries, datasets | ~1 TB | No — not backed up | No |
| $SCRATCH | /scratch/0xxxx/username |
Active job I/O, temp files | No limit | No — not backed up | Yes — files unused for 10 days |
Important:
$SCRATCHis not permanent storage. Files that have not been accessed in 10 days are automatically purged. Do not store anything there that you can’t afford to lose.$WORKis also not backed up, so keep your own copies of critical data.
Rule of thumb:
- Put your code and input data in
$WORK - Run jobs that write output to
$SCRATCH - Keep only essential config in
$HOME
Step 5: Load Software Modules
TACC uses the Lmod module system to manage software. Nothing is loaded by default.
# See what's available
module avail

# Search for specific software
module spider python

# Load a module
module load python3/3.11

# See what you have loaded
module list

# Unload a module
module unload python3

# Reset to defaults
module reset
Common modules you might need:
module load python3       # Python
module load gcc           # GNU compilers
module load cuda          # GPU computing (if applicable)
module load intel         # Intel compilers
module load mvapich2      # MPI for parallel computing
Step 6: Submit Your First Job
TACC uses the Slurm workload manager. You do NOT run compute-heavy work on the login node — you submit it as a job.
Create a Job Script
Create a file called my_first_job.sh:
#!/bin/bash
#SBATCH -J my_test_job          # Job name
#SBATCH -o my_test_job.%j.out   # Output file (%j = job ID)
#SBATCH -e my_test_job.%j.err   # Error file
#SBATCH -p normal               # Queue/partition (normal, development, gpu, etc.)
#SBATCH -N 1                    # Number of nodes
#SBATCH -n 1                    # Number of tasks
#SBATCH -t 00:10:00             # Wall clock time (HH:MM:SS)
#SBATCH -A YOUR_ALLOCATION       # Allocation/account name — provided by the allocation manager

echo "Job started at $(date)"
echo "Running on node: $(hostname)"
echo "Hello from TACC!"

# Replace the lines below with your actual work
module load python3
python3 -c "print('Python is working on TACC!')"

echo "Job finished at $(date)"
Submit the Job
sbatch my_first_job.sh
Monitor Your Job
# Check job status
squeue -u $USER

# Get detailed job info
scontrol show job <job_id>

# Cancel a job
scancel <job_id>
Check Output
Once the job completes, check the output and error files:
cat my_test_job.<job_id>.out
cat my_test_job.<job_id>.err
Step 7: Transfer Files
If your files are hosted online (Google Drive, GitHub, Dropbox, a web server, etc.), you can download them directly to TACC using wget:
cd $WORK
wget https://example.com/link-to-your-file.zip
To download from Google Drive, use the shareable link with wget:
wget -O my_file.zip "https://drive.google.com/uc?export=download&id=YOUR_FILE_ID"
Tip: The
YOUR_FILE_IDis the long string of characters in your Google Drive sharing link between/d/and/view.
Downloading Datasets from the Web
You can use wget to pull publicly available datasets directly onto TACC — no need to download to your laptop first and then re-upload.
# Download a file from any public URL
cd $WORK
wget https://data.example.org/dataset.csv

# Download and rename the file
wget -O my_data.csv https://data.example.org/some-long-filename.csv

# Download an entire directory listing (use with caution)
wget -r -np -nH --cut-dirs=1 https://data.example.org/my-dataset/
This works with any publicly accessible URL — research data repositories, government datasets, course materials, etc. As long as the file has a direct download link, wget can grab it.
Common Slurm Queues
| Queue | Max Nodes | Max Time | Use Case |
|---|---|---|---|
development |
4 | 2 hours | Testing and debugging |
normal |
256 | 48 hours | Standard production jobs |
gpu-a100 |
varies | 48 hours | GPU workloads (check your system) |
large |
512+ | 48 hours | Large-scale parallel jobs |
Queue names and limits vary by system. Run
sinfoto see available queues on your system.
Quick Reference
| Task | Command |
|---|---|
| Log in | ssh user@system_hostname.tacc.utexas.edu |
| Check allocation balance | allocations or /usr/local/etc/taccinfo |
| See available modules | module avail |
| Load Python | module load python3 |
| Submit a job | sbatch script.sh |
| Check your jobs | squeue -u $USER |
| Cancel a job | scancel <job_id> |
| Check disk usage | du -sh $WORK |
| Download files to TACC | wget https://your-link-here |
Getting Help
- TACC Documentation: https://docs.tacc.utexas.edu/
- TACC Support Ticket: https://portal.tacc.utexas.edu/tacc-consulting
- Allocation Questions: Contact Ashley Scruse — ashley.scruse@morehouse.edu
Checklist Before You Start Computing
- Received TACC project invitation email
- Created TACC account using the invitation link
- MFA set up and tested
- Successfully SSH’d into the system
- Ran a test job with
sbatch
Once all boxes are checked, you’re ready to go!